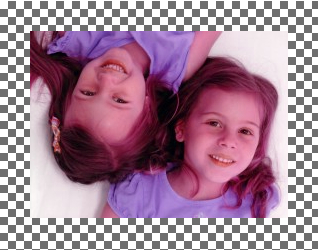
Done it before with PHP, but now that JavaScript is all-powerful, let's see how we can manipulate images in an HTML <canvas>.
Pixel manipulation
The simplest way to fiddle with image data is to take each pixel and change the value of one or more of its channels: red, green, blue and alpha (transparency), also known as R, G, B and A for short. The results may vary from mostly useless to "wow, that sepia was easy, I'm totally doing it for all my thumbnails!"
A trivial example is to just swap some values. E.g. take the amount of B and assign it to G.
rgb(100, 50, 30, 255) becomes
rgb(100, 30, 50, 255)
Callbacks
For the purpose of this demo I've isolated the part that deals with the canvas API (loading an image file, reading and writing pixels) from the actual pixel manipulation. The manipulation itself is in the form of simple callback functions.
The example above (B to G and G to B) is written as
function (r, g, b) {
  return [r, b, g, 255];
}
Here we ignore alpha, because we don't need it and hardcode it to 255. Here's the result:

from the original:

Let's say you want to touch alpha and make an image partially transparent. Here's the callback:
function (r, g, b, a, factor) {
  return [r, g, b, factor];
}
Here we let the user specify a factor in other words how transparent should the image be. We use this as a value for the alpha channel.
The result of calling this with factor of 111:

And the most complicated form of callback is taking into account where this pixel is in the overall image. Here's a gradient:
function (r, g, b, a, factor, i) {
  var total = this.original.data.length;
  return [r, g, b, factor + 255 * (total - i) / total];
}
And the result of calling this with factor of 111:

this refers to an object of our own design which you'll see in a bit. It keeps some info in case the callbacks need as is the case above.
The canvas part
For the canvas stuff I started by copying an old post to load an image into a canvas. This constructor was born:
function CanvasImage(canvas, src) {
  // load image in canvas
  var context = canvas.getContext('2d');
  var i = new Image();
  var that = this;
  i.onload = function(){
    canvas.width = i.width;
    canvas.height = i.height;
    context.drawImage(i, 0, 0, i.width, i.height);

    // remember the original pixels
    that.original = that.getData();
  };
  i.src = src;

  // cache these
  this.context = context;
  this.image = i;
}
You use this by passing a reference to a canvas element somewhere on the page and a URL to an image. The image has to be on the same domain for the image data part to work.
var transformador = new CanvasImage(
  $('canvas'),
  '/wp-content/uploads/2008/05/zlati-nathalie.jpg'
);
The constructor creates a new Image object and once it's loaded it draws it into the canvas. Then it remembers some stuff for later such as the canvas context, the image object and the original image data. `this` is the same `this` that pixel manipulator callbacks have access to.
Then you have three simple methods to get, set and reset the image data into the canvas:
CanvasImage.prototype.getData = function() {
  return this.context.getImageData(0, 0, this.image.width, this.image.height);
};

CanvasImage.prototype.setData = function(data) {
  return this.context.putImageData(data, 0, 0);
};

CanvasImage.prototype.reset = function() {
  this.setData(this.original);
}
The "brains" of the whole thing is the transform() method. It takes the pixel manipulator callback and a factor which is essentially a configuration setting for the manipulator. Then it loops through all pixels, passes olddata rgba channel values to the callback and uses the return values from the callback as newdata. At the end the new data is written back to canvas.
CanvasImage.prototype.transform = function(fn, factor) {
  var olddata = this.original;
  var oldpx = olddata.data;
  var newdata = this.context.createImageData(olddata);
  var newpx = newdata.data
  var res = [];
  var len = newpx.length;
  for (var i = 0; i < len; i += 4) {
   res = fn.call(this, oldpx[i], oldpx[i+1], oldpx[i+2], oldpx[i+3], factor, i);
   newpx[i]   = res[0]; // r
   newpx[i+1] = res[1]; // g
   newpx[i+2] = res[2]; // b
   newpx[i+3] = res[3]; // a
  }
  this.setData(newdata);
};
Pretty simple, right? The only confusing part could be the i += 4 increment in the loop. See, the data returned by canvas' getImageData().data is an array with 4 elements for each pixel.
Imagine an image with only two pixels - red and blue and no transparency. The data for this image is
[
  255, 0, 0, 255,
  0, 0, 255, 255
]
And this is it. You use the objects created by ImageCanvas constructor like so:
transformador.transform(function(r, g, b, a, factor, i) {
  // image magic here
  return [r, g, b, a];
}, factor);
Feel free to play in the console with this on the demo page
Callbacks (contd.)
The rest of the code for the demo is just the setting up pixel-fiddling callbacks and creating some UI to use them. Let's check out a few.
Greyscale
Grey is equal amounts of r, g, b. So you can simply average the three values to get a single value:
var agv = (r + g + b) / 3;
This is good enough, but there's a secret formula that does a better job for humans, because it takes into account our species' sensitivity to the different channels. The result:
function(r, g, b) {
  var avg = 0.3  * r + 0.59 * g + 0.11 * b;
  return [avg, avg, avg, 255];
}

Sepia
A lazy sepia is to make a greyscale version and then add some color to it - equal amounts of rgb to each pixel. I add 100 to red and 50 to green and I like it, but you can play with different values.
function(r, g, b) {
  var avg = 0.3  * r + 0.59 * g + 0.11 * b;
  return [avg + 100, avg + 50, avg, 255];
}

There's a second sepia callback which is supposed to be better, but I don't like it as much.

Negative (invert)
Subtracting each channel from 255 gives you a negated image:
function(r, g, b) {
  return [255 - r, 255 - g, 255 - b, 255];
}

Noise
Noise is kind of fun, you take a random value between -factor and factor and add it to each channel:
function(r, g, b, a, factor) {
  var rand =  (0.5 - Math.random()) * factor;
  return [r + rand, g + rand, b + rand, 255];
}
Noise with factor of 55:

Your turn
I'm leaving some of these manipulator callbacks for your source exploration and then to your imagination. What can you think of?
Go nuts with those callbacks in the console! Your basic "template" again is:
transformador.transform(function(r, g, b, a, factor, i) {
  // image magic here...
  return [r, g, b, a];
});
Try e.g. - blue to 255. Or make it black and white (not greyscale, make each pixel either 0,0,0 or 255,255,255)
Comments? Find me on BlueSky, Mastodon, LinkedIn, Threads, Twitter


